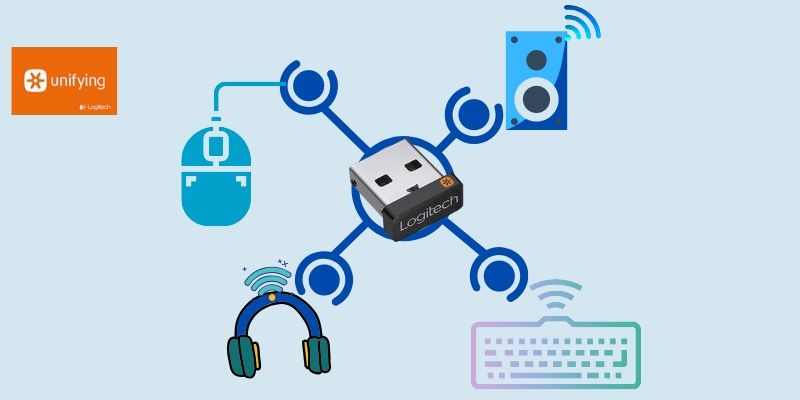
In today’s fast-growing universe people choose to be smart and fast. They prefer a hassle-free life. Why download Logitech unifying software? With one tiny receiver, your wireless devices can instantly be ready to use with your computer. The convenience that can be received by the software is unmatchable. The number of USB ports can be reduced with this Software.
For each device no longer different receiver will be required. Once your notebook or computer is connected with your Logitech Unifying receiver you can access the device from anywhere if you be at home, work, or even at the road. I always recommened my blog reader to download any logitech software from the offcial Logitech website. No one shouldn’t download logitech unifying or gaming software from any third party website. For your convenience, in this post, I have provided official website download link. Now, visit the link and downoad Logitech Unifying software for Windows 10 and macOS.
| File Name | OS | Size |
| Logitech Unifying Software- 2.50.25 | Windows 10, 8.1, 7 and XP | 4 MB |
| Logitech Unifying Software- 1.3.375 | macOS 10.15, 10.14, 10.13, 10.12 OS X 10.11, 10.10, 10.9, 10.8 | 3.8 MB |
| Logitech Unifying for Chrome | NA | NA |
Table of Contents
Software download link
Download for Logitech unifying software for Windows 10/8.1/7 and Mac latest version from the official website. This link automatically detects your OS and find the software to download.
What is Logitech USB unifying receiver software?
Extremely small and versatile dedicated USB Wireless receiver, that is engineered basing on nRF24L-family of RF devices.
Most importantly the device first needs to be linked to a 2.4GHz radio communication computer that allows connecting up to six human Logitech peripherals.
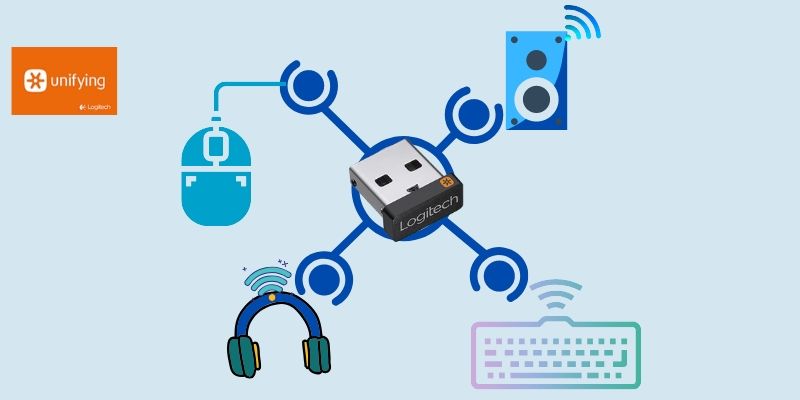
Even though Bluetooth is not compatible but in a similar manner the devices get connected to Unifying software with a single device without using the unifying protocol.
Often the software of Logitech Unifying is included in wireless Logitech bundled sets or sometimes separately can be purchased.
How to download Logitech unifying software
The minimum system required to download the software:
- Operating System: MS Windows and macOS.
- Memory (RAM): 1GB or above.
- Hard Disk: 500MB Free Space of Hard Disk.
- Processor: Intel Core i3 or above.
First, go to the official site and download the software. Note that run the software as a device administrator. Open the device you want to add and allow it to detect and pair the software. Add the devices when its shown on the software screen.
Software details
Developer: Logitech
Version: 2.50.25
Language: English
Size: 4 MB
Update : 2010-03-30
License: freeware
Systems: Windows
Compatibility : macOS / Windows 10
How to install Logitech unifying software in Windows 10 and Mac
If your vision is to connect to your PC with multiple wireless Logitech devices then the only thing to undertake to is to put within and download the software. It will allow you a passage to beat on any gaming challenge that simply you may encounter online. However, if you don’t acumen to put in a unifying receiver, then you’d possibly be wondering if there is a requirement to induce the software installed on your computer or not. The answer to this question is yes. The unifying receiver doesn’t get to be installed by you, but rather, they’re going to be purchased from the Logitech.
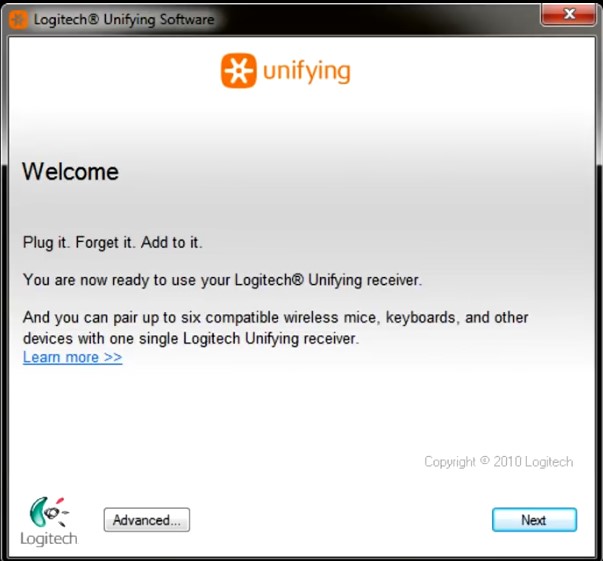
Now, let’s see how you’ll install unifying software.
- Firstly, Download Unifying software.
- As a system administrator now run the software.
- Click all the subsequent options.
- Open it after you put in the software and turn on any Logitech device you want to add.
- Let your device detect the software.
- When your device is shown on the software screen, add it. Simply add Logitech gaming devices to unifying software.
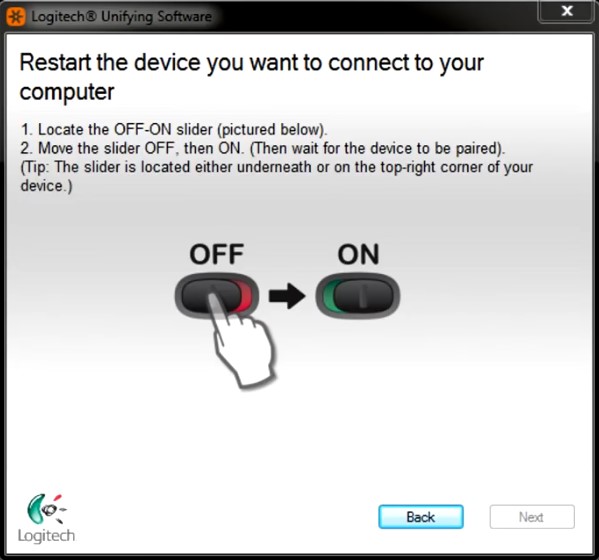
connect a device with PC through unifying software
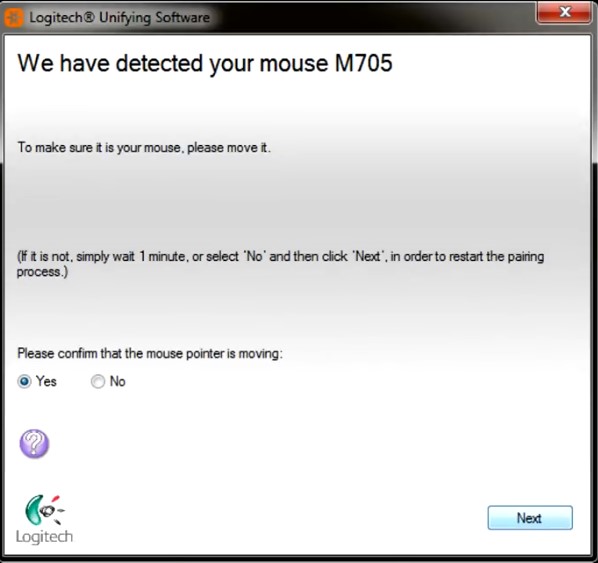
Unifying software device detection confirmation
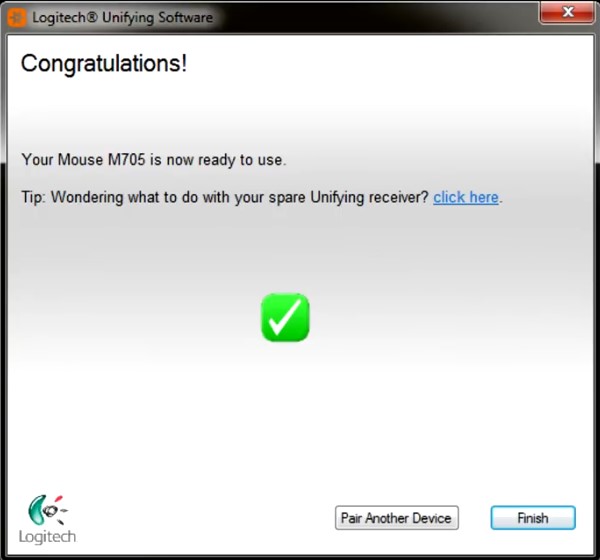
installation confirmation page unifying software
How to use Logitech unifying software
Logitech has a simple interface and protocol to use unifying software which allows by using an equivalent receiver you to attach multiple Logitech products. So, you’ll keep one USB receiver always plugged into your laptop and it’ll connect and communicate with all of your wireless peripherals. That’s the Plug it and forget it tagline that Logitech uses to plug its wireless products.
Another case of use where you’ve got multiple mice and keyboard pairs for your laptop. One does not have to be compelled to keep it up switching the USB receivers to create this work. If you simply want to leave back away at work and also the other at home, that’s clearly 4 receivers managed every day and taken care of on behalf of you.
How to pair Logitech unifying software
One can use the software to attach their keyboard or mouse to their computer. If you do not have already got it installed, you’ll need to download Unifying software from the Software Downloads page. Now, steps to be followed for pairing.
- First, launch the the software.
- For Windows: Start > Programs > Logitech > Unifying > Logitech Unifying Software.
- Macintosh: Application> Utilities> Logitech Unifying Software.
- At rock bottom of the Welcome screen, click Next.
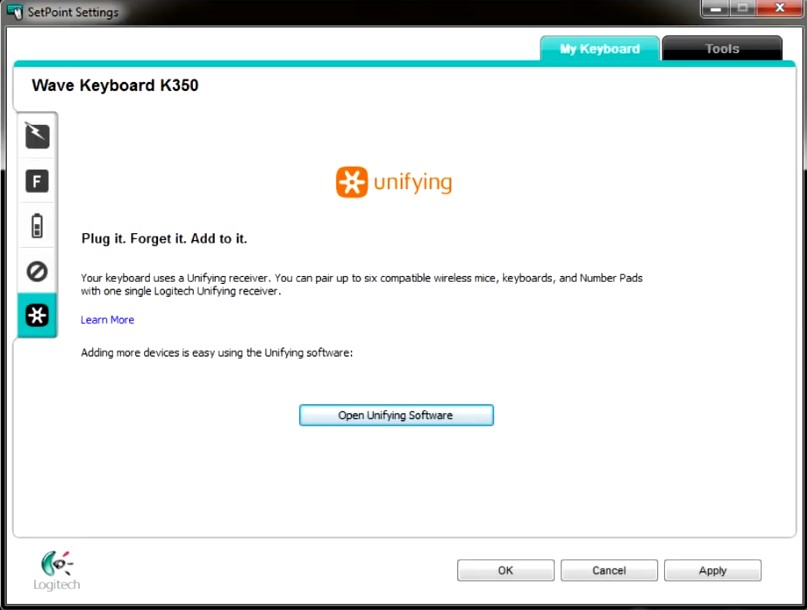
Logitech Unifying software with keyboard k350
Follow the on-screen instructions to show your device off then back on when you see the “Restart the device…” window.
Your device when detected it will show a message “We have detected you’re…” confirmation screen. A test message within the field provided to form sure it works.
- .If your device connected successfully, click Yes then Next.
- If your device doesn’t work directly, wait a moment to ascertain if it connects.
- If it doesn’t, select No then click Next to restart the pairing process from the beginning above.
- Click the Finish button to exit the Software (or Pair Another Device to pair additional devices).
- Now your device should now be connected.
Logitech Unifying software vs setpoint
It is a bit confusing and messy when one is not so much tech-savvy this might take him to a dead end. But even though saying that, it’s not even that much difficulty of rocket science. Firstly, both Unifying software and setpoint come from the same brand. The device you use it might for simple office work or you might be a high-end pro-gamer

Logitech Unifying software vs setpoint
basing on that you just have to choose the right one for you. Basically, setpoint allows the user to customize your computer peripherals i.e. mouse buttons, keyboard F-keys, and hotkeys. It can also notify of our device’s battery status, and whether Caps Lock and Num Lock are on.
Logitech Unifying software: troubleshooting
What to do when not detecting USB receiver
Many times the users may face a problem regarding USB not detected. But let me assure you, you are not alone with this problem. If you are bugged with this problem, don’t need to worried about as this is not at all a hard problem. This problem can be fixed by one of the following solutions below:
01. Driver file copy from another well-working computer
If your current computer lacks the driver that is needed for your mouse to work properly, follow the steps to fix it.
Go to C: Drive folder of another working computer and try to find us.PNF and usb.inf files.
If not found, then try to search the file via the path of C: WindowsSystem32.
By now file should be found. Simply now copy the file and paste it in the folder C: Windowsinf of your current computer.
02. Update mouse and USB driver
For an unresponsive mouse, the most common reason is the outdated version of the mouse or the USB. To get the things correctly there are two ways Automatic driver update, Manual driver update.
- Automatic driver update- If you are in hurry don’t have the time, patience or computer skills to update your drivers manually, you can instead allow it automatically with Driver Easy. Driver Easy will automatically recognize your system and find the right drivers for your exact mouse and USB port, and your variant of Windows 10, and it’ll download and install them correctly.
- Manual driver update- you’ll be able to update your drivers manually by reaching to the manufacturer’s website and checking out the foremost recent correct driver. Note that for your USB driver, you will be got to try both the manufacturer of your PC and also the manufacturer of your USB port’s chipset. make certain to settle on only drivers that are compatible together with your variant of Windows 10.
03. As an administrator, run Logitech unifying receiver
By running the unifying as an administrator can help the receivers to work properly.
Press the Windows logo key and R at the same time from your keyboard. In the dialogue box type devmgmt.MSC and press Enter.
Expand the mouse or any other pointing device and choose disable.
Download the software and after installation from start, the panel selects unifying software and run it as an administrator.
Voila, your computer should work now pretty smooth.
04. A hard test perform
While performing hard tests one must disconnect all peripheral devices.
Foremost the computer should be turned off.
For any port replicator or docking station, the computer should be removed.
All external connected peripheral devices such as USB storage devices, external displays, and printers should be disconnected.
From the computer unplug the AC adapter.
If you are using a laptop remove the battery from the battery compartment.
To drain any residual electrical charge from the capacitors that protect the memory for about 15 seconds press and hold down the Power button.
Insert the battery and plug the AC adapter and get back into the notebook computer, but do not connect any of the peripheral devices.
To turn on the computer press the Power button.
If you open the startup menu, use the arrow keys to select Start Windows Normally, and then press the Enter key.
After reconnecting each of the peripheral devices, run the Windows Update to update all device drivers.
What to do when doesn’t detect mouse
This error appears in Unifying Software when attempting to attach a Logitech wireless device to your computer. To resolve this issue, you’ll get to have a way of interacting together with your computer. If employing a laptop, simply use the inbuilt keyboard and mouse. If employing a desktop tower, connect a wired keyboard and mouse to the tower.
Start with the fundamentals.
Restart your PC, then check to ascertain if the Software is in a position to detect your Logitech Unifying receiver.
To determine if the Logitech Unifying receiver remains functional, connect the Logitech Unifying receiver to a distinct computer. If the Logitech Unifying receiver doesn’t work on a distinct computer, the Logitech Unifying receiver is perhaps defective.
The Logitech Unifying receiver will be connected to a USB interface on your computer so as for the Software to detect the Unifying Receiver. make sure the Logitech Unifying receiver is securely connected to a USB interface on your computer.
What to do when not pairing or failed
As we start with the solutions, make sure that you have administrator access on your computer, and the Unifying Receiver is not broken physically. Moreover, make sure that all your chipset drivers are installed. Also, check if your system’s firmware/BIOS is updated to the latest build.
Also, check if your dongle’s connections are not loose. Steps can summarize as:
Take the dongle’s black cap off.
Now make the contact points closer either by sticking a piece of paper inside or by pressing the points
Then stick the cap back on to dongle.
The next workaround that works for some users was using the SetPoint software from Logitech. This is an app that allows the people to customize differently with the mouse buttons and also with keyboard keys in addition to configuring other device settings. According to them, installing the SetPoint can automatically detect the peripherals connected.
Navigate to the official Logitech SetPoint website and also download the application.
After installing, restart your computer. Now right-click on the application and click Run as administrator. Hopefully, you will hear a sound that new devices are connected. Then you will be again asked using on-screen instructions to turn the mouse on and off.
What to do when not detecting keyboard
If all the above methods don’t work, we can also try the power cycling your computer properly. Power Cycling is another act of completely draining your computer’s power so all the temporary configurations can get reset. This will solve the problem if your computer is in an error state.
Turn off your computer normally using Shut down.
Now it’s time to take out all peripherals connected to your system. This includes USB hubs as well.
And also take out the power cable of the computer and keep pressing the power button for at least 30 seconds. If you are using a laptop, unmount battery for 30 seconds.
Now, wait for 5 – 10 minutes before plugging everything back in. Check if the issue is resolved.
Things to do when windows 10 not working
If you’ve got exhausted all the possible workarounds for your Logitech Unifying Receiver, we will plough ahead and uninstall the problematic Windows Update. there have been many users who complained that their device became unusable after a Windows Update was installed on the pc.
Press Windows + R, type “appwiz.cpl” within the dialogue box and press Enter.
Once within the application manager, click View installed updates present at the left side of the screen.
Now look for the subsequent update on your installed list.
If you see the update, right-click thereon and choose Uninstall.
After uninstalling the update, restart your computer properly. Check if you’ll use your Unifying device properly. If you’ll, you’ll head over to Microsoft’s official website and download a hotfix for preventing driver updates from reinstalling.
Make sure that you simply run the hotfix using administrator privileges.
How to update Logitech unifying software
Logitech is on the side of vulnerability as of the use of the single wireless chip in the dongle. Attackers could monitor keyboard communication traffic, inject keystrokes through dongles not connected to a wireless keyboard, recover encryption keys, and take over your computer.
Updating your Logitech unifying receiver to protect yourself from these relatively simple attacks.
Navigate to Logitech’s update download page in a browser and download the appropriate Windows or Mac update package for your computer.
Double-click the update file to launch it (Windows) or unzip it, then double-click it (Mac). The Logitech Firmware Updating Tool should launch.
Select Continue.
The tool will screen your computer and let you know if any Logitech devices need to be updated. Follow the instructions as needed.
If it detects any devices to update, select Update.
If the devices are up to date, the tool will inform you, and you can select Close to exit the tool.
Uninstall steps for mac
Most Mac apps are self-contained, and therefore the trash-to-delete option works on all versions of Mac OS X and later. In most circumstances, you’ll take the drag-and-drop thanks to deleting Logitech Unifying Software from your computer. Here are the regular steps to uninstall the Software on Mac:
Step 1: Quit the Software in addition to its related processes if are still running.
Step 2: Launch Finder on your Mac, and click on Applications within the Finder sidebar.
Step 3: look for the Software within the Applications folder, then drag its icon to the Trash icon located at the top of the Dock, and drop it there. Also, you’ll right-click/control click Logitech Unifying Software icon then choose to Move to Trash option from the sub-menu.
Step 4: If prompted, enter the administrator password and hit okay to allow the change.
Step 5: Choose Finder > Empty Trash from the Menu bar. Or choose the right-click Trash icon, choose Empty Trash, and Empty Trash again within the pop-up dialogue.
Besides, you furthermore may trash the app from the Launchpad interface. During the method, you’ll be prompted to enter an administrator’s password to make the deletion take effect. Note that the instant you empty the Trash, the app is going to be permanently faraway from your Mac. This act is irrevocable so you won’t do the steps with caution.
How to uninstall in Windows 10/8.1 and 7
Logitech Unifying Software is a great operating system but there are times when the users are annoyed and want to uninstall the Software from their computers. There are two main steps that he can uninstall it manually and automatically. Firstly, he should apply the necessary caution to take the back-up precautions as there are chances of important files being created in this format that he cannot afford to lose.
Go to the Add or the Remove Programs Control Panel applet and click Uninstall Software. If you want to uninstall the Software from the command prompt by performing the following steps:
Start the computer in Safe Mode with Command Prompt support (press F8 during start-up)
Navigate to %systemroot%system32.
Type osuninst.exe and press Enter.
Follow the onscreen instructions.
If the Software is installed as a dual-boot system along with another operating system then you can simply format the partition on which it is installed. That is one of the reasons why it is always recommended to install separate operating systems on separate partitions.
To uninstall this Software manually, there are also some steps the user should follow.
- The user should go to ‘Start’ and then to ‘Control panel’.
- The next step is to navigate to the option of ‘Add/ Remove programs‘ and find the program from the list.
- Clicking on the ‘Remove‘ button you will help to follow the uninstall wizard and to finish the removal.
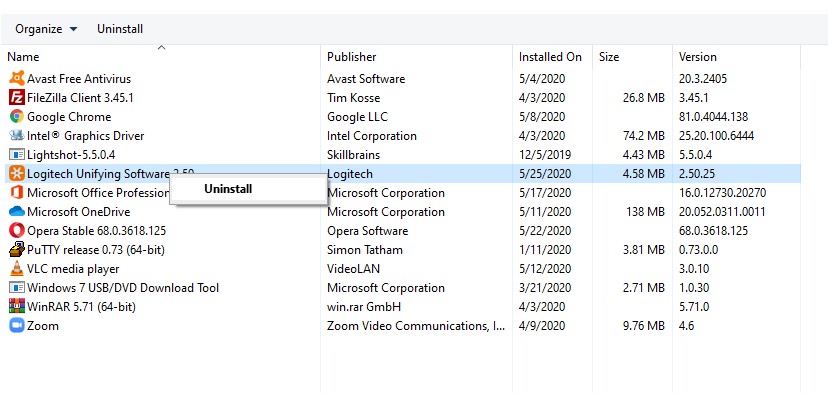
uninstalling unifying software Windows 10
Uninstalling the Software automatically is the biggest achievement for a novice PC user since it does the work very efficiently and with the least of the hassles.
The automatic uninstaller should be now installed on your computer easily. Then the user now should locate where the program is stored on the system.
The next concrete step is to click the selected folder and also click ‘Uninstall’ to begin the process again of removal.
This method ensures that this program is thoroughly uninstalled from the computer without any hassles and entries left down in the program files.
The users also vouch for the convenience and the excellence of uninstalling this Software with the help of a third-party uninstaller since it thoroughly scans the computer and removes the program from the hard drive and the Windows registry.
How to unpair
To unpair your device:
- Open the Unifying software: Start > All Programs > Logitech > Unifying > Logitech Unifying Software.
- On the Welcome window, click Advanced.
- In the left pane, select the device you would like to unpair.
- On the right side of the window, click Un-pair, then click Close. this can remove your mouse or keyboard from the list of Unifying devices and it’ll not work together with your computer.
To make your device work again, you’ll get to repair it with the Unifying receiver.
FINAL THOUGHTS
So, in my belief, this software is one of its kind which makes it easy even for novice people who still are not comfortable with PC.
Also read,
- Logitech g502 software download for Windows 10
- Download Logitech g203 software for Windows 10
- Download Logitech gaming software
